Adobe Analytics Segments - The Basics
29 Jan 2017 » Analytics Tips
Those of you who have been long enough in the Web analytics market, will remember that in old version of SiteCatalyst, there was no concept of segmentation. As an alternative solution, you could use ASI slots, DataWarehouse segments or VISTA rules. However, these solutions were clunky, rigid and, sometimes expensive. The Adobe Analytics segments as we now them today come from the release of SiteCatalyst 15. Initially, the tool was still immature, but over time, it has become more sophisticated and it is still evolving. In this post, I will be covering the very basics of segment creation in Adobe Analytics.
Segment manager
The Adobe Analytics interface offers various links to get to the segment manager, depending on where you are. However, there is one link that is always available, through the “Components” top menu:

From here, you get the list of segments that have already been defined. In here, you can filter the segments to find the one you are interested in: by report suite, by tag, by name or by owner. When you have been working with segments for a while, you end up having dozens, if not hundreds, of them. It is therefore highly recommended to apply a naming convention and use tags. This simple solution will make your life easier later, when you want to find one.
Create a new segment
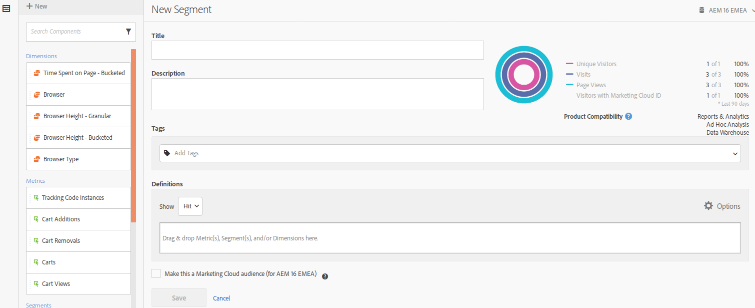
After clicking on the “New” button at the top of the page, you should see the segment editor.

The first thing you should do is to name it, add a brief description and apply some tags to it. Remember, you want to easily find your segments later. This is the easy part.
Segment containers
There are three types of segment containers, which you need to understand very well.
- Hit. This is the most granular container. Basically, you are requesting all page views and link clicks that qualify for certain conditions.
- Visit. This is the next level above hit. With this container, you are requesting all hits within visits, which qualify for the conditions. In other words, if the qualification happens only in one hit of the visit, then all hits are included in the segment. Do you still remember the definition of a visit?
- Visitor. As the least granular container, this will include all hits from all visits from a visitor who has qualified for the condition at any point in time.
If you need additional support, check the official help for segment containers.

Segment components
Once you have a decided which container you need, you need to configure the conditions that will make a hit/visit/visitor qualify for the segment. For this, you have four sections of components:
- Dimensions. This is any variable that you can find in Adobe Analytics: out-of-the-box variables, eVars, props…
- Metrics. As with the previous case, you can use any out-of-the-box metrics or custom metrics (events).
- Segments. Segments can be nested.
- Time. Additional conditions to qualify when the condition was met.
Initially, you will only see 5 for each, but clicking on the component name, you will get all of them. You can also search for a component name.
Once you have found your desired segment component, you just drag and drop it in the rectangle named “Drag & drop Metric(s)…”. It will automatically be added. Finally, for dimensions and metrics, you need to finalise the condition: a comparison operator and a value.
Component combination
Very often, with a single component you do not have enough. Adobe Analytics allows to combine components using the following operators:
- AND. All conditions must be met.
- OR. Only one condition must be met.
- THEN. The qualification of the conditions must happen in the specified order.
In order to get that, you need to drag another component below the previous one. Once you drop it, you will bet the opportunity to select the operator.
Practical example
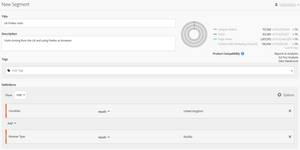
Enough with the theory. Let me show you an example of a segment: all visits coming from the UK and using Firefox as browser (click on image to show in full screen)
You will also notice that, as you compose the segment, the top right corner mini-report updates automatically to give you a quick view on the size of the segment. In my example, the segment is very small (<1%).
And that’s it, you have created your first segment! Save it and you can reuse it in Analytics, wherever a segment can be applied. We will see some examples in a later post.
Complex segments
You will have noticed that I have skipped many subjects in this post. In particular, I have left out any complex concepts, as I plan to write another post to address the more complex segments features. For now, let’s keep it simple.
