Introduction to Triggers
18 Jun 2017 » MSA
If you have been keeping up with the news of the Adobe Marketing Experience Cloud, you will probably have heard the word “triggers” quite a lot lately. My colleague Mathieu Hannouz conducted an excellent presentation, in which he explained this new feature. In case you do not know what triggers are, this post is for you.
Before triggers
We all have received those reminders to finish our online purchase after we abandon a virtual shopping cart. This very simple marketing activity has shown very good results. I am not going to bore you with the details, but the idea is very simple: re-engage with visitors after they drop a basket and do not convert and encourage them to buy.
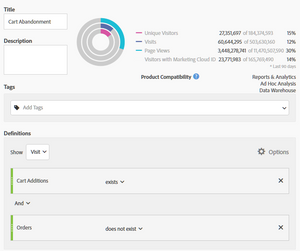 Before triggers, the Adobe’s only available solution was to create a Data Warehouse report with a segment of “visits where the visitor added something to the basket but did not buy”. Many Genesis integrations with ESP offered this option out of the box and, when I started consulting for Adobe Analytics, this solution was enough. However, over time, many marketers started to consider that the 24h delay of a DWH report is to much to re-engage. Apparently, research started to suggest that there was some sort of sweet spot to send a re-marketing email, well below 24h.
Re-marketing is not the only use case. Other use cases would include sending an email when users perform specific actions on the website, like clicking on a link or starting a session. Again, only DWH reports offered a solution.
Adobe’s solution
A solution was needed. Some customers looked for other tools. Those with access to Adobe Analytics Premium, had an option: Live Stream. You still had to code it yourself, but you could now see, in near-real-time, when a visitor had abandoned his cart.
The next step was for Adobe to offer a complete solution, with a front-end and a back-end. The idea is still the same, hook onto Live Stream and add some processing power to it. One of the benefits of using Live Stream is that dynamic variables, processing rules, VISTA rules and marketing channels have already been executed. This combined solution was named “triggers”.
Types of triggers
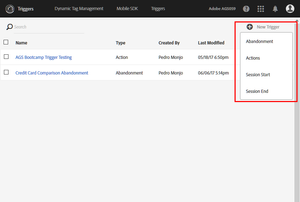
There are four types of triggers at this moment:
- Action. Fire the trigger immediately when a user falls into a segment.
- Abandonment. Fire a delayed trigger if the user is in a segment.
- Session Start. Fire a trigger as soon as a new visit starts.
- Session End. Fire a trigger as soon as a visit ends.
It is important to note that the segments here are not Adobe Analytics segments. It is a reduced version, compared to the Analytics engine. You will notice it immediately, when you create your first trigger. This makes sense, as Analytics segments require a lot of processing and can be very complex and now we need speed.
Creation and configuration
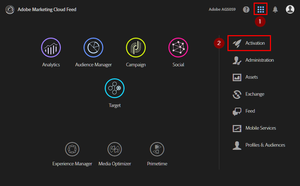
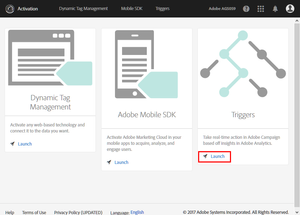
The process to create and configure triggers is very simple. Just go to the Activation core service, select triggers and click on “New Trigger”.
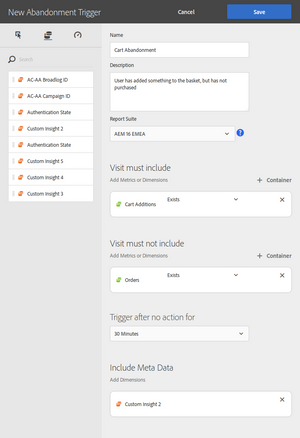
There are a number of parameters that all trigger types have in common:
- Name & description. For classification purposes only. As usual, follow a good naming convention.
- Report suite. Which Live Stream to listen to.
- Meta data. When a trigger is fired and sent to a destination, it can carry additional data. This data can only be an eVar.
For Abandonment and Action, you have to select the conditions to fall into the segment, with an interface similar to the Analytics segment. Finally, only in the abandonment trigger, you have to select the delay, between 10 minutes and 2 hours. Here you can see again the difference between abandonment and action: action is immediate; abandonment are delayed.
As an example, let’s create a cart abandonment trigger, to be fired after 30 minutes of inactivity:
Using triggers
You might be wondering, what can I do with this new capability? With all that I have explained, I am sure you see no benefits. In fact, triggers by themself do nothing. What you want is to perform actions when triggers are fired. In a later post, I will explain how to use them with other tools. Stay tuned!
