Server-side Adobe Target
19 Aug 2018 » Server Side
This is the last post on the server-side everything series, at least for now. While I prepared the material for this post, I realised an interesting fact. Adobe Target does not require a lot of technical knowledge, when used on websites. However, server-side Adobe Target is the most complicated of all server-side implementations. Let’s see why.
Target activity
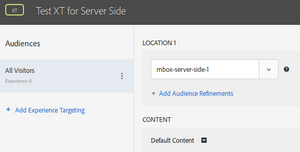
Before you start coding, you need to create a Target activity. Do not try advanced Target features; instead, start with an A/B Test or an Experience Targeting. For obvious reasons, the VEC makes no sense here, so we need to use the Forms interface:
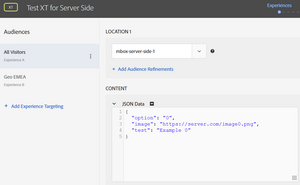
Remember to give a name to the activity. In the “Location 1”, you have the option to select an existing mbox. In server-side Adobe Target we have to use regional mboxes, so set a name of an mbox you have never used before in this account; for example, “mbox-server-side-1”. Obviously, it is not available in the drop-down, as you have not made any request with this mbox name, so you will need to type it.
You now need to decide how you want to receive the information for each of the experiences. I recommend you use JSON, and I will be using it for the rest of this post. However, you may use XML, HTML or others format.
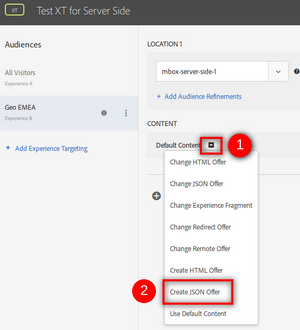
Now, for each of the experiences, you need to create the JSON offer with the details of the experience. This is what Target will return when you make a call to the mbox, as we will see later. The structure and contents of this JSON object are completely up to you and will depend on the requirements for the test or personalisation. Click on the arrow next to “Default Content” and select “Create JSON Offer”:
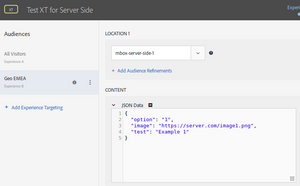
Now, just put your JSON object in the text area:
You may be tempted to leave an experience with “Default Content”. Although this is correct, I do not recommend it. The reason is that, when invoking the API, default content equates to empty content. If you take this into account, go ahead with it, but I recommend putting something so that you always get some content.
Click on “Next” to review the targeting. You should not need to change anything there.
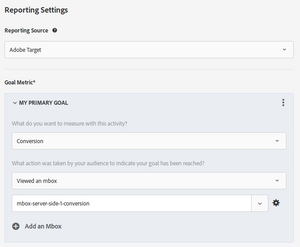
Click on “Next” again for “Goals & Settings”. For now, select “Adobe Target” as Reporting Source.
The trickiest part is the goal metric. Again, this is not a client-side implementation, which limits us the options. My recommendation is to go for the easiest goal: “viewed an mbox”. Again, you have to set the name of this mbox, but I suggest you just add some suffix to the main mbox, like “-conversion”.
Click “Save & Close” and, once the activity has been sync’ed, you can activate it. We are done with the preparation!
Invoking the Adobe Target API
You can find the documentation for the Adobe Target API in this link: http://developers.adobetarget.com/api/. Always refer to it in case of doubt. In fact, it is impossible to cover all the cases in this post and I will only show a simple example. For anything else, please, refer to this official documentation.
One word of caution before proceeding. You will have noticed that there are two types of calls: “Server Side Delivery” and “Server Side Batch Delivery”. Always use the batch version, even if you do not need batch features. This is the new version of the API and the other one may be retired in the future.
As I mentioned above, this API is more complicated than the others I have explained so far. There are different types of calls and arguments. I will only explain here how to get an mbox content.
Preparing the request
You first need to create a JSON object with all the parameters you want to pass to the API. In my test I used the following:
{
  "client": [client code],
  "contentAsJson": true,
  "id": {
    "marketingCloudVisitorId": [mid]
  },
  "aamParameters": {
    "blob": [AAM blob],
    "dcsLocationHint": [AAM region],
    "uuid": [AAM UUID]
  },
  "mboxes": [
    {
      "indexId": 0,
       "mbox": [mbox name]
    }
  ]
}
The parameters are:
-
client: This is your client code, the value that you see in the domain of your Target calls before “.tt.omtrdc.net”. -
mid: As usual, this is the MID (d_mid) value you would have retrieved from the ECID service, which you should have invoked before calling Adobe Target. -
blob: The blob (d_blob) returned by the ECID service. -
dcsLocationHint: The region (dcs_region) returned by the ECID service. -
uuid: The value of the demdex cookie, which should have been set when calling the ECID service. -
mbox: the name of the mbox you are interested. You will have noticed that this is part of an array, so you can request multiple mboxes in one call, each one with a differentindexId. In this example, it would be “mbox-server-side-1”, as set in the Adobe Target UI.
There are many more parameters than what I am showing in this example; refer to the batch input parameters documentation in case you need more. If you are lost with what the ECID service is or you need a refresher, review my post on server-side ECID before reading on.
Calling the API
The format of the HTTPS call is:
> POST /rest/v2/batchmbox/ HTTP/1.1
> Host: [client code].tt.omtrdc.net
> Accept: */*
> User-Agent: [browser UA]
> X-Forwarded-For: [browser IP]
> Cache-Control: no-cache
> Content-Type: application/json
> Content-Length: [JSON length]
>
> [JSON object]
Where:
-
[client code]must be the same as in the JSON request (see above). -
[browser UA]is the User-Agent of the browser accessing your service, not that of the code you are running server-side. -
[browser IP]is the IP address of the browser accessing your service. -
[JSON length]should be set to the size in bytes of the[JSON object]. -
[JSON object]is the JSON request object we have created above.
Processing the response
The payload of the response will be another JSON object:
{
  "requestId":"7170c706-7c9a-46d9-b6a8-7646dea6d552",
  "client":[client code],
  "id":{
    "marketingCloudVisitorId":"02830272077695645723311406445617485952"
  },
  "edgeHost":"mboxedge21.tt.omtrdc.net",
  "contentAsJson":true,
  "mboxResponses":[
    {
      "mbox":"mbox-server-side-1",
      "content":{
        "option":"0",
        "image":"https://server.com/image0.png",
        "test":"Example 0"
      }
    }
  ]
}
Some properties are just a copy of the same values in the request, as you can see. The most important part from this response is the mboxResponses property. It contains the result of Target’s decision for the visitor: a random offer for A/B tests or the personalised offer in an experience targeting activity. In particular, we are interested in the content attribute:
- If there is no content, then it means that you should be showing the default content. This is why I suggested to create a JSON object as default content, so you always get something and do not need to create a special case in your code.
- The JSON object you configured in Adobe Target.
In the previous example, you can see the content matches my Target configuration:
Conversion
All Adobe Target activities must have a conversion. In my example, I created the conversion mbox named “mbox-server-side-1-conversion”. If the visitor converts in the way you wanted for this activity, you must then request this mbox, following exactly the same format as above. Just ignore the response for this mbox request, as it is only meant for conversion, not for content. Target will use this information to calculate lift and confidence.
Sample code
As usual, I am sharing with you the scripts I have used to test the previous example. I am fully aware that this not cover all potential cases, but this should be enough to start with.
Location of the script: at-mbox-get.
I assume that you already have ecid.sh from server-side ECID and it works. Further instructions:
- Download the script and store it in the same directory as ecid.sh.
- Rename it, changing the extension from .txt to .sh.
- Edit it and set your client code and mbox name
- If necessary, give the script executable permissions:
chmod a+x at-mbox-get.sh. - Make sure ecid.sh has already run and generated the
ecid.jsonandcookies.txtfiles. - Run the script:
$ ./at-mbox-get.sh
Feel free to modify these files until you get what you are looking for. Let me know in the comments if you run into any issues.

