URL-based destinations
05 Apr 2020 » AAM
The typical destination of Adobe Audience Manager segments are DSPs. However, there are two other types of destinations. I have already written about cookie-based destinations. The other one is URL-based destinations. This name should not confuse you. It is actually, setting pixels dynamically, but only when you qualify for a segment.
Pixels
The simplest way of telling a 3rd party that a visitor is on your website, is by placing an image on your website. When the browser processes the HTML, it will find an <img> tag with a URL to a domain different that where the HTML is hosted. The browser has no issues with that and will fetch the image, using the HTTP protocol, as with any other asset. The server will also (try to) set a 3rd party cookie to uniquely identify the visitor. Since it is a 3rd party cookie, the visitor can be tracked in other websites.
You may be wondering what happens with the rendering of the image. In principle, you should see it as part of the page. Well, there are a couple of tricks:
- The image is usually a transparent GIF with a size of 1×1 pixels. In other words, it is an image of just 1 pixel and this is why people call it just “a pixel” and this is what I will be calling it from now on. It is so small and transparent that you will have a hard time finding it in your browser. It is usually placed at the very bottom, after all the contents, to avoid any disruption of the content.
- Using JavaScript or CSS, you can completely hide this pixel.
The final point to understand is that this 3rd party can generate multiple pixels, each having a different URL and a different purpose:
- Since many websites will use this 3rd party, it would be good to have different URLs for different websites.
- Even within a website, you will want to use different pixels depending on what the visitor has done: landed on the website, registered for the newsletter, purchased something…
Why URL-based destinations
In general, the pixels explained above require that you insert the <img> tag in the HTML or through a tag manager like Launch. This does not give you too much flexibility: if it is hardcoded in the HTML, it will always be there; through a tag manager, you can add some conditions to only place it under certain situations. However, this conditions are quite limited.
With AAM, you can place pixels on your website when a visitor qualifies for a segment, on any page. This feature gives you great flexibility:
- You do not need to code it in your HTML or tag manager.
- You can use any condition available in AAM to fire this pixel.
What about use cases? Some advertising solutions do not allow for server-to-server connections with DMPs. Instead, they work based on pixels. The two typical cases are:
- Google Remarketing Lists for Search Ads (RLSA) (documentation)
- Facebook Website Custom Audiences (WCA) (documentation)
Navigating the UI
Let’s see how you create one such destination. As with all destinations, you start by going to “Audience Data” > “Destinations”. Then, click on “Create Destination”.
Basic information
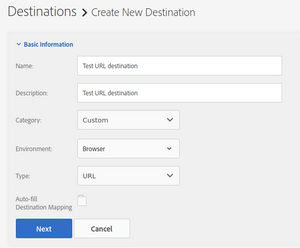 You probably know what to do here, but I suggest the following:
- Name. A short description of this destination.
- Description. A longer description, which you will probably need in a year’s time, when you have forgotten why you created it.
- Category. Leave it as “Custom”.
- Environment. I am not sure what the other options would do here, but, to me, it only makes sense to use “Browser”.
- Type. Obviously, “URL”.
- Auto-fill Destination Mapping. I will come back to this parameter a bit later in the explanation.
I will skip “Data Export Labels”, as this topic requires its own post, or maybe even more than one.
Configuration
The parameter “URL Type” is new to me. According to the documentation, you have to set it to “Website audience for social platforms” when used with Facebook WCA and, I guess, with other social networks. Otherwise, leave it as “Custom URL”.
The important parameter here is “Serialize”. Do not get confused by its name, it is more than a serialization.
- Not set. This means that each segment gets its own URL and, if you qualify to multiple segments, multiple pixels will be fired. When mapping a segment to this destination, you need to provide the full URL of the pixel. In other words, this destination becomes a placeholder, which you can use for whatever you want. In theory, you would only need one URL-based destination without serialization and you could use it for all your 3rd parties of this type. I find it a bit confusing.
-
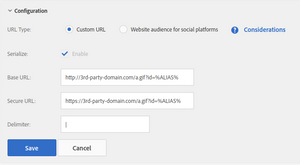 Set. This is for 3rd parties that allow to concatenate multiple segments in a single URL. You have to provide two generic URLs, one for HTTP and another for HTTPS, both with the placeholder macro:
 %ALIAS%, and a delimiter. Depending on the parameter “Auto-fill Destination Mapping”, the placeholder macro will be populated with the segment IDs or the segments’ integration codes, separated by the delimiter. All these parameters are not provided by Adobe. I would not expect the 3rd party to provide you with this parameters directly, but you can probably infer them by looking at the documentation.
Segment mapping
When you map a segment to a URL-based destination, you will have two options:
-
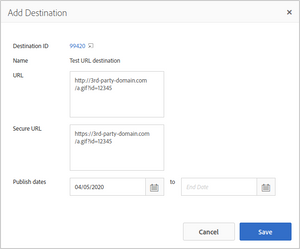
Non-serialised destinations. As explained above, you will have to provide the URLs, both for HTTP and HTTPS. Any URL will work.
-
Serialized destinations. In this case, since you have already provided the URLs, the mapping is simpler. It will just show the destination value, which will replace the placeholder macro
%ALIAS%.
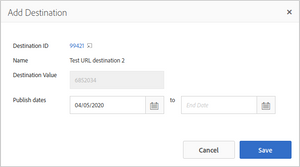
You are probably wondering why there is this difference between HTTP and HTTPS. Shouldn’t both be the same, except for the scheme? Well, some providers may have different domains or different paths. AAM allows you to provide different URLs, in case your provider needs that.
Debugging
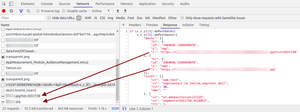
This case should be very easy. Using your network debugger (Charles or your browser’s developer tools), you should just see a call being made to the expected URL, on the same page where you qualify for the segment. The initiator will be dest5.html. This is how it looks like in my tests with 2 URL based destinations, one serialised, the other non-serialised:
You can also check the returned value from the analytics call. It should contain the URLs that are meant to be called:
As long as you qualify for the segments, AAM will fire the pixels on every page.
One final note. It is best to test these destinations with Google Chrome. Other browsers, most notably Safari and Firefox, will block the calls or the setting of 3rd party cookies.

