Consent Management - Part I
28 Feb 2021 » Launch
From being completely ignored to becoming a legal requirement, consent management is now a mandatory part of all website implementations. Until not that long ago, Adobe tools did not have a satisfactory solution. Adobe Analytics, Adobe Target and Adobe Audience Manager had a different way of managing it. However, with the ECID service, you now have a centralised option to manage all tools. This is the first post of a 2-post series, where I will explain how to configure the Adobe Opt-In mechanism.
Consent Management Platform
The first thing that you need to have, one way or another, is a Consent Management Platform (CMP). This is the software on the website that shows to the visitors the different options to choose from and stores the decision. You all have seen it: it is this annoying (but mandatory in some regions) modal that you get when you access a website for the very first time and it requests that you give permission to cookies and tracking.
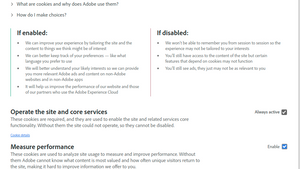
As an example, this is the one at adobe.com:
If you really want to, you can build it yourself, but I would not recommend it. There are a few vendors in the market that offer the full solution and all you have to do is add it to your website and configure it. If you need some examples, Evidon, OneTrust and TrustArc offer CMPs. I have seen them in my projects with customers, but I do not have any personal preferences.
Legal Department
In most of my posts, I usually explain technical details, give you my opinion or talk about high level concepts, which apply to digital marketing. You can, generally speaking, take my post and apply it however it suits you better. However, in this case, you should not even breath before you get a written confirmation from your legal department, that it is acceptable what you are going to do. Let me reiterate: if you implement consent management without a very clear direction from your legal team, bad things will happen. For starters, GDPR sets a maximum fine of €20 million or 4% of annual global turnover (whichever is greater) for infringements.
The first thing you need to do is get this team’s attention, which is sometimes difficult, and ask them about what you need to do to be GDPR compliant. They will surely have lots of questions and you will probably have to explain them in layman terms, basic things like cookies, 1st party data and similar concepts. Remember that they are lawyers, not technical people. I know that very well as my family is full of them. Take your time, find alternative explanations in case they do not understand, but make sure they finally get it.
There are 3 important outputs you need from that conversation:
- Get approval of the text that needs to be displayed in the CMP modal. Usually, CMPs have a default text, which is probably good enough. In this case, your legal team just needs to confirm that they are happy with it or provide some amendments.
- Get approval of the type of information you are capturing from the visitor, including cookies. This is also an opportunity to make sure you understand each other.
- Get the list of default opt-ins. In other words, what is the minimum set of checkboxes in the CMP that can be enabled by default, when the visitor comes for the very first time to your website.
This last point can be very controversial. If you get the mandate to disable everything and your consent modal is barely visible, the user may ignore it. The consequence is that you will not be allowed to collect valuable data. To avoid this situation, some websites put a blocking modal on the first page of the first visit and, until the visitor does not accept or reject it, the website is not accessible. This solution forces the visitor to first interact with your CMP. Once he accepts, the website can track the first page view as usual, without losing any data. On the other hand, this can seem very intrusive.
Adobe Opt-In
OK, so you have your CMP in place. Now, you need to tell the Adobe tools about the consent given by the visitor. Again, you could add all sorts of crazy logic in your code or tag manager, to fire or not fire the calls to the different tools. However, Adobe added the Opt-In Service in the ECID service to make your life easier. It may look difficult initially, but once you understand it, it is very simple.
In this and next posts, I will only show here the configuration through Launch. If you use another tag manager, it should give you similar options. And, if they do not, you should be complaining that they need to add this functionality. I will also assume that you are already using the ECID service. In fact, it is a prerequisite.
I would discourage you from configuring it manually in code, although it is possible. If you really need to do it, as you follow these 2 posts, when you compare the Launch UI with the the Opt-In API Reference, you will notice that there is a clear parallelism between the two. The UI features have a direct counterpart in code.
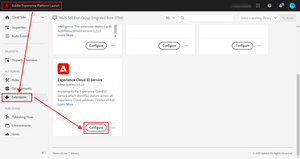
To start configuring it, in Launch, go to the Extensions page. Then, click on “Configure” in the Experience Cloud ID Service:
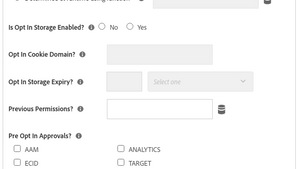
You should then see, in the configuration page, a section called Opt In:
If you are not seeing this section, it probably means that you have an old version of the ECID extension. You first need to update it to the latest version in the Extensions page.
In the next post, I will explain in detail how to configure each of the Adobe Opt-In parameters.
Image by rawpixel.com


